banner
Solution for Dislocation of Acromioclavicular Joint
2021/06/30

Comparison between Hook Locking Plate and Button Plate


Comparison of postoperative clinical results:


Observation group is better than control group on the basis of abduction of AC Joint and Shoulder pain, the difference reach statistical significance (p<0.05)


Comparison between Hook Locking Plate and Button Plate


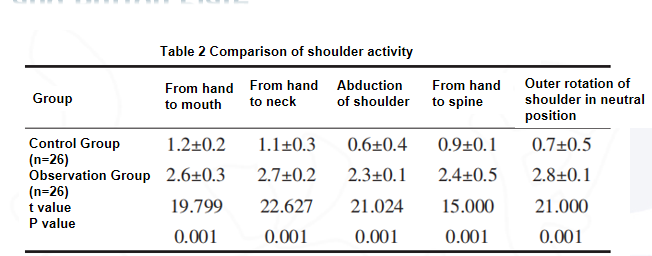
Comparison of shoulder activity:

Observation group is better than control group, the difference reach statistical significance (p<0.05)


Advantages of elastic reconstruction of coracoclavicular ligament with button plate:

No obvious surgical scars, less trauma and small incision. Reduce effectively the postoperative pain, no obvious discomfort, consistent with AC joint biomechanism, fast postoperative  early functional recovery and fewer complications


Research on different ways of coracoclavicular ligament reconstruction


All four methods can enhance and stabilize AC Joint Dislocation. Group A and B increase the stability on horizontal plane (p<0.05)


Surgical Technique


1. Establish the Channel through Clavicle and Coracoid Process

  • Assemble the Location Hook, Guide Sleeve, Location Guide Wire and Cannulated Drill Bit with Curved Guide Handle.
  • Place the Location Hook under the coracoid.
  • Drill to the coracoid through posterior lateral clavicle according to the location. (Note: The location is 5mm to the edge of clavicle)
  • Establish the tunnel of clavicle and coracoid through 4 layers of bone cortex.


2.  Limited reaming and pass the loop through the tunnel

  • Remove Guide Sleeve, then use 5.0mm Limited Drill Bit to ream.
  • Remove Limited Drill Bit and 1.5mm Location Guide wire.
  • Pass the Guide Wire through the Cannulated Drill Bit along the clavicle-coracoid tunnel to the visible incision on coracoid. (Note: Pull the Cannulated Drill Bit up at the meanwhile to ease the Guide Wire passing)
  • Remove the Cannulated Drill Bit, then pass the 2-0 Loop through head coil of Guide Wire.
  • Use the Guide Wire to pull the 2-0 Loop through the tunnel.


3. Fix the AC Joint


  • Fix the loop into the slots of AC butterfly Button, then clip the 2-0 loop.
  • Seat the AC Butterfly Button at the base of coracoid, with the loop maintaining tension in the process.
  • Remove Location Hook and Guide Handle, and wrap the proximal part of loops on Wire Grip.
  • Adjust the loop to ensure that the Clavicular Mini Button is fixed on the clavicle knotlessly.


4. Distal Clavicular Fracture Combined with AC Joint Dislocation


  • The Surgical Technique is basically consistent with AC Joint Dislocation, without the limited reaming.
  • Same Instruments with AC Joint Dislocation.
  • Note: Ensure the order of screw insertion is correct when the system is used with Distal Clavicular Locking Plate.

https://www.doublemedicalgp.com/ac-cfloop-adjustable-button-and-plate-system_p205.html

Leave A Message
Leave A Message
If you are interested in our products and want to know more details,please leave a message here,we will reply you as soon as we can.

Home

products

about

contact